Tuesday, August 18, 2009

Getting Buggy!

For all of my fellow fans of the Cricut, I thought I would share some of my favorite blogs and websites for Cricut inspiration.

Bitten By the Bug - Regina's team always has lots of creative ideas and a new challenge each week.

Tammy's Place - Tammy does amazing cards and layouts with the Cricut.

Chirper Challenge - This site does challenges every other week.

Just a Scrappin' - This is a good blog if you are looking for basic information and tutorials about individual Cricut cartridges and all of the various accessories for the Cricut machine.

Whimsical Scraps and Bugs - This is another fun challenge site. I just discovered it, but it also looks fun.

Of course, all Cricut owners should sign up for the newsletter and the messageboard at www.cricut.com. The messageboard is filled with wonderfully creative Cricut owners sharing layouts, crafts, cards and most of all great information and tips about the Cricut.

Ok, enough gushing from me last time I checked I was not on ProvoCraft's (maker of the Cricut) payroll ;)

Happy scrapping!

Friday, August 14, 2009

Warehouse Sale: Sassafras Lass

Just saw this on one of my new favorite blogs CraftGossip and I thought I would share. I love Sassafras Lass. I'm very tempted to take advantage of this, I mean just about anything from Sassafras Lass would be useful and fun, but CE is 2 weeks away, so I really need to refrain. But you should enjoy!

Warehouse Sale: Sassafras Lass

Posted using ShareThis

Christmas in August?

So I've noticed a lot of stores both on-line and brick and mortar having "Christmas in July" type sales. I recently had a great time picking up digital freebies (and I did end up putting in an order) at DesignerDigitals Christmas in July event. With all the early holiday buzz, I thought I'd finish up the last of my holiday layouts from 2008.

The first one is about last year's tree trimming and the fact that it was the first year that my 2 sons were really into decorating the tree and really helpful.
I used an 8.5 11 in. layout template from Jessica Sprague for Creating Keepsakes to layout and print my photos. I then matted the photo paper on white cardstock and added a strip of blue pattern paper from BasicGrey to balance the layout and add my journaling. Not groundbreaking, but quick and effective.

The second layout I finished up was one about making cookies with my sons.

Finishing up these layouts made me realize that the holidays in 2008 were really special because, it was the first year that my kids really "got it" - not just the presents, but the enjoying of family traditions. It was good to relive those memories and see that connection.

Thursday, August 13, 2009

Feeling Crafty

So 2 Peas in a Bucket is doing a 9-week class called Thinking Inking with Jennifer McGuire. Now the class is in it's final week, but don't fear you can watch all of the short videos on YouTube. That's what I've been doing. Now in general I would consider myself more collector of rubber stamps and ink pads, and not so much of a user. I think this is because it don't really know how to use rubber stamps and ink to create the types of effects and art I see and love in magazines and on websites. Anyway, this weekend I watch Jennifer's video on using Perfect Pearls (I've added a link to this product if you don't know what it is). Basically Perfect Pearls are shiny pigment powders that you can apply to paper products using a sticky embossing pad called Perfect Medium and a brush. You use water to set it. Now I have seen people do amazing cards and projects with these powders, so of course I have several unopened jars of the stuff. So I was excited to watch this week's video on using Perfect Pearls to see if I could learn more about them.


If you have these powders in your stash I highly recommend checking out Jennifer's video. I learned a lot. I tried out some of my new knowledge on 2 bookmarks/tags I cut out using my Cricut.

Wednesday, August 12, 2009

Going to Creative Escape 2 weeks from Today

So I'm doing it. My mom and I are going to our first Creative Escape this year in exactly 2 weeks. I'm really excited and I hope that I really love it. This will be my first time going away on any type of scrapbook retreat, and my first time taking classes with any of the instructors that will be at Creative Escape - so everything is sort of an unknown. One thing I know for sure is that my mom and I will have a great time at the resort.

So as the event gets closer, we're starting to get a few fun things from the organizers. Check out this really cool "autograph"/ mini-album I made from a digital kit that the organizers put together for attendees. Pretty cool, I think!

Of course, I will be blogging about my experiences when I get back. In the meantime, let me know if you've ever been to Creative Escape and your experience.

Tuesday, August 11, 2009

It's My Wedding Anniversary


Today is my 8th wedding anniversary! Wow, time really does fly. The last 8 years with my husband have been amazingly eventful, and I'll just say upfront not all of it is fit to remember in the family scrapbook. LOL! Here is the card I plan to give him. My husband loves comics and video games, so I wanted to create a cartoon image of one of our wedding photos. This was my best effort in photoshop elements. Unfortunately, the photo is not very clear, but I like the way the card turned out.

Monday, August 10, 2009

Memories Monday - My Hilton Head Vacation Scrapbook Album

I recently got back from a wonderful trip to Hilton Head with my family. On the trip I took tons of pictures, and when I got back I was excited to get started creating a vacation scrapbook album. So I thought I would share my process for creating theme albums.

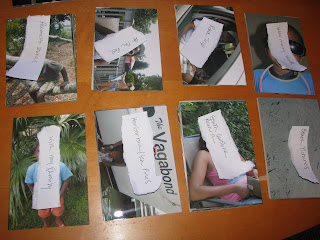
The first thing I do is upload my photos to my computer. For this trip I took a total of 200 photos over the course of a week. Not bad but before I start my album I need to whittle this down to a more manageable set of my best photos. So the second thing I do is start deleting all of the fuzzy, out of focus, too dark, or poorly composed pictures. Next I get the rest of the pictures printed as standard 4x6 photos. Not all of those photos will go into my scrapbook album, probably less than half. The rest of the photos will go in a family photo album. In addition, I will also take some of the better photos and enlarge them or add text to them for my album. But once I have all of my photos printed, I organize them and plan my album. It's weird, but its hard for me to really organize my photos on the computer. I organize the photos in whatever way feels natural. In this case I organized them by vacation events. See my piles and labels below.


Next, I decide how I will organize my album. When it comes to a vacation album the most obvious way to organize it is chronologically. And that is basically what I decided to do, but I also plan to include some relationship and fun activity layouts

Next, I gather all of the memorabilia from my trip and put it in a large ziploc bag. Some of the items I have from my trip are maps, newspaper and newsletters, postcards, sea shells my son collected, and information from the resort company we used about our beach house. Some of this will make it into my album, and some will go in the trash. But for now everything's in the bag.

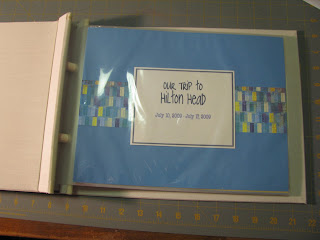
Finally, I pick out an album and a basic color scheme. In this case I picked a nice cream-colored linen 11x8.5 inch landscape album from Martha Stewart Crafts that I picked up on sale around the holidays. I rarely do theme albums in 12x12 sized albums. I think the basic 7-day vacation just lends itself to a smaller size. But I don't go too small either, otherwise I can't fit that memorabilia I mentioned.

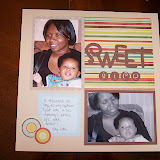
For the color scheme I picked yellow, blue, green, brown, and orange. A lot of colors but basically earth tones. Once I've decided on a color scheme I don't get too rigid with the products I use. I tend to pick embellishments and pattern paper based on the layout I'm working on. I also don't just stick to paper. For this album I'm doing a combination of digital and paper layouts. I find digital layouts help me get more photos on my page in an artful way and more done quickly. Paper layouts allow me to add texture and include the memorabilia in a natural way. I'm using Bazzill's 8.5 x 11 inch Earth Tone Basics cardstock and Michelle Underwood's More Than Words digital kit. Finally I choose fonts. Now this is not necessary if you plan to hand write your album. I don't plan to hand write mine, so I picked a couple of fonts that I will use for every layout. This creates continuity and helps keep it simple. I'm using the Joyful Juliana font and Art House Vibe Alpha brushes for my titles, and American Typewriter for all of my journaling.

Ok, now with all of that done I start writing. Why, because I can't scrapbook until I know what I'm scrapbooking about. So after photo selection (and sometimes before), I begin my albums and many of my layouts with journaling. I write my title page. I write a basic table of contents/ themes I want to cover. Then I write about my vacation. I write about the road trip, I write about my impressions of our beach house, I write about meeting my husband's extended family, etc. I don't finish all of my journaling at one time and not everything will make it into the album, but by writing about my trip first, I have a great outline and idea guide for my album.

Now the fun part. Putting it all together. I will talk more about planning pages and adding memorabilia in my next Memories Monday.